|
Bookettes!
I make my bookettes differently than
most people. The two main things that I do that make mine faster and easier are, 1.) I
don't cut out the individual pages. Instead I use a partial book of the smallest size of
Post-It notes and 2.) Instead of fussing with wire and hole punching I make my
"binding" by using 1" brass hinges.
Materials
1 sheet Shrink Plastic cut into
2-4.4" x 5.5" pieces
1-1" Brass Hinge
Heat Tool
Contact Cement
Scissors
Post-It tablet (smallest size)
Background decorating media (chalks, Fabrico ink, markers, etc.)
Permanent ink for non-porous surfaces (JudiKins or 213 or ZimInk) |
|
You can sand the shrink plastic lightly with 300 or higher grit
sandpaper (extra fine). This will make the plastic hold the color better. It is especially
recommended if you are using chalks. If using colored pencils, sanding is not
necessary.
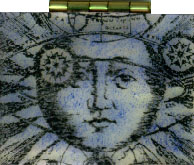
Decorate the background of your front and back covers. Shrink
plastic is easiest to cut when before it is heated, so stamp your image using the
permanent ink and then cut the image out if desired. When the ink is dry (it will become
dull looking) use your heat tool to shrink the pieces (this can also be done in the
oven - which gives better results). If you shrink the plastic too fast it will curl in on itself and stick. It is
important to heat the piece up before starting to shrink. When the piece has shrunk as far
as it will go, and while it is still warm, trim any irregular pieces off and
sand to reshape if necessary.
Using the contact cement (follow the directions on the
tube), affix the hinge to the front and back covers
of the bookette. Use contact cement also to affix the pack of Post-Its to the
back of the hinge.
|
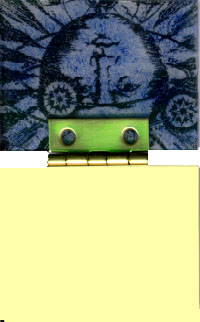
This is the same bookette as is above except now you
are looking at it from the inside (opened up). I used clear shrink plastic for this one so
you can clearly see the design (which is stamped on the outside) through the front cover. This picture clearly shows how the hinge is affixed to the front and back
covers and how the Post-It notes are inserted. |
If you have a technique or sample you'd like to
contribute to this site, please email me at christine@coxes.com.
Back to my
little rubber stamping page
The small print: The book designs
on this page are the property of their respective owners. Likewise, the stamp images are
copyrighted (in most cases) by their legal owners. None of these images should be
reproduced in any form without prior consent of their owners. I am not making money from
this effort and I will always give credit where credit is due. If you have a copyrighted
image on this page and want it removed, please email me at christine@coxes.com and I will be happy to comply.
You may want to consider, however, that this is free advertising to a pre-qualified group
of potential buyers. Conversely, if I missed giving credit to someone, email me so that I
can correct my oversight.
|